OverView
MagicColors automatically enhances the colors and contrast of your
images with its breakthrough technology in regional colormapping.
Simply load an image, press the start button, wait a moment and see
sophisticated shining, brilliant new result images.
Much care has been put into the design and userinterface of MagicColors
to help making this help not too voluminous.
How it works
Start
the following screenshot shows the basic layout:
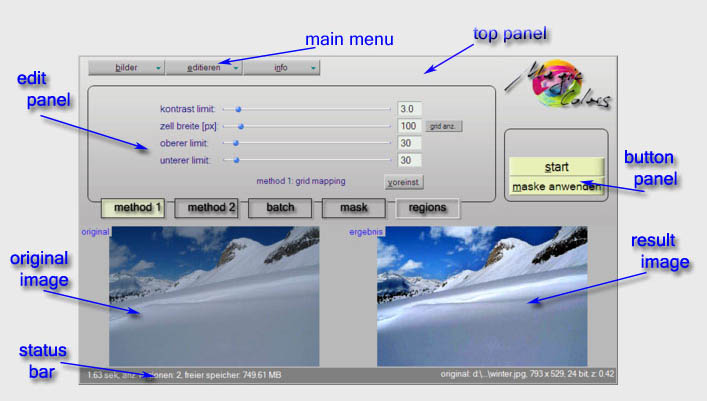
MagicColors offers 2 methods to remap different color levels:
method 1: a grid is used to divide the image into subimages,
identify the color distribution for each subimage and remap the colors
with respect to adjacent subimage cells. Width and height of the
cells is adjusted with the "cell width" slider. Adjust contrast and color enhancement
with the "contrast limit" slider. High "contrast limit" values may result
in high noise amplification. The "high shift"/"low shift" sliders
determine the mapping range and influence the light and dark pixel values.
This method also allows to process real HDR (High Dynamic Range) images,
whereby under HDR more than 8 bit/colorchannel is understood .
Starting with Vers. 3.00, MagicColors supports 48bit RGB images which
may be loaded as camera raw, tiff, png, ... images. The 48bit mode is
activated with the checkbox "process images as 48bit RGB (16bit/channel)".
In this mode, all images will be processed as HDR, i.e. also 24bit images
(for processing they will be converted internally to 48bit images). The contrast limit
is determined in this mode through a different algorithm - it goes more
into the darker regions and causes less colorshifts than in 24bit mode.
Advantages of 48bit RGB:
- the color remapping enhances noise, which especially with jpg images
may manifest in disturbing jpg-artefacts. Camera raw images show
significantly less noise.
- 16bit/channel mean 65536 graduations vs. 256 with 8bit/channel -
meaning of course there is much more information in the image
available (High Dynamic Range HDR).
The human eye hardly notices this as it may differentiate graduations
only in the 8bit range (Low Dynamic Range LDR). The used color mapping
process enhances contrasts in the HDR domain and projects these
into the LDR domain - showing structures otherwise not or hardly noticable.
This is especially of advantage in technical, forensic or medical image analysis.
method 2: the software tries to identify regions with different
light levels within the image. The colormapping is applied within these
regions to improve the regional contrast and color distribution. The "method 2" editpanel
shows 4 global parameters (global = for all regions) used for
remapping the image. As with method 1, the "high shift"/"low shift" sliders
determine the mapping range and influence the light/dark pixel values.
The "distance" parameter denotes the pixeldistance 2 neighbouring regions influence each other.
Indicate with the "regions" slider into how many regions you wish the
image to be divided - this is a wish, the resulting number of regions maybe
less than this number.
start: pressing the start button in the button panel on the right handside
will start processing the original image on the left handside with the
currently selected method. The progress and processing steps will be
shown within the progressbar on the statuspanel at the bottom. The color
enhanced result image is displayed on the right handside. In case method 2
was selected, you may view the generated mask image for identified tonal
regions: rightclick the result image to open its contextmenu, go to
"images" and select "mask". Alternatively, open the mainmenu "image" item,
and select "show mask". Redisplay the result image with the same line of action.
The status bar at the bottom shows some processing values (time,
regions used..) on the left, and some image parameters on the right
(z stands for current zoom factor).
logo: clicking on the MagicColors logo at the topright will terminate the
program.
User Interface
Doubleclick on the top panel or edit panel will maximize/normalize
the MagicColors window. With a single mouseclick on those panels the
application window may be moved. Clicking the logo at the top right
corner closes the application.
All sliders may also be moved with the left/right cursor keys
and the page up/down keys. Clicking with the mouse on the sliderbar
moves the sliderthumb to the clickpoint.
imagepanels
The right click context menus of the images offer possibilities to
copy and paste to and from the clipboard. You may adjust the zoom value
via the contextmenu or use the mouse wheel to zoom in and out at the
mouse point. An image may be panned using the left mouse button.
The result image also offers the possibility to select between the
mask and the result.
mainmenu

- image: within the image menu, you may open a new image, save the
result image, open, save and clear the mask, switch between mask and
result image.
It also offers a history of opened files within the
"recent" menuitem.
- edit: offers "copy" and "paste" functions (for the original image)
and to select between different languages. The "undo" entry is for
editing the mask image within the mask panel. Open the options dialog
to configure parameters like jpg-compression or batch-processing behaviour.
Also supported languages may be selected within this menu.
- info: "about" to show the program version etc. and "help".
regions tabsheet
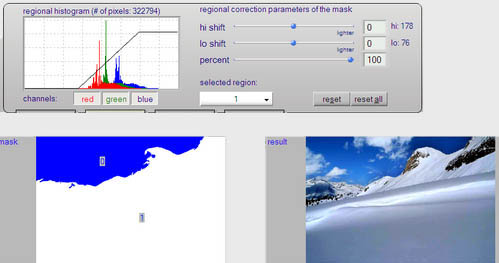
With method 2, a region tab is offered.
Clicking it, the region tabsheet displays the mask image on the left handside.
The mask image displays the different regions used for color optimizing
identified by numbers and colors. Within the region edit panel you may
edit parameters of each region used. The currently selected region is
shown with its color on the "selected region" button at the bottom and may be
changed there by opening its selected region contextmenu or altenatively by
doubleclicking a region within the mask image.
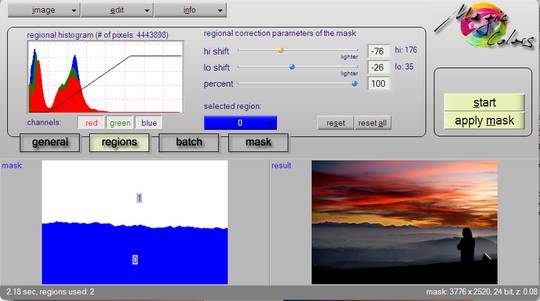
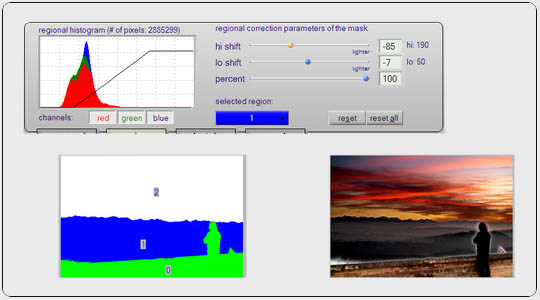
Displayed on the left of the regions edit panel is the histogram of
the selected region, together with a simplified representation of the color
mapping transfer function (CMT)- the black step line. The CMT
representation shows the used low shift value on the left and the high
shift value on the right. Those values may be edited via the
"hi shift", "lo shift" sliders.
To influence individual color channels through the CMT, select them
via the channel buttons below the histogram image.
With the percent slider the border influence of the selected
region on neighbouring regions may be adjusted. With this regional
parameter eventual halos may be reduced, as well as with the global
parameter "distance".
The "reset" button resets the values of the selected regions to it's
original values, the "reset all" button resets all regions to their
original values.
mask tabsheet
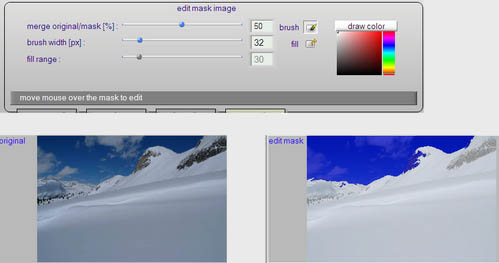
With method 2, the mask panel offers sophisticated edit capabilities to adjust
individual regions of the image. The mask
and the original image are merged on the right handside. The merge value
may be adjusted via the "merge original/mask" slider in percent.
Setting it to zero displays the mask alone. The currently selected
region for editing is indicated through its color on the
"draw color" button. The current draw color is selected with
the mouse cursor located above an image region (move the mouse over
the "edit mask" image). Holding down the ctrl key doesn't change the
color when the mouse enters a new region. The brush width is depicted
with the mouse cursor and may be
changed with the brush width slider. Mask regionborders may be changed
holding the left mouse button down while moving the mouse (colorpicker
and brush in one).
Zooming in/out with the mouse wheel also changes the brush width with
regard to the image (or use the context menu of the image to change the
zoom value). To pan the image, hold down the Alt-key.
To define a new region for color mapping, select a new color via the
"draw color" button, which drops down a color select panel when clicked.
Switch to fillmode by checking the "fill" box. In this mode, the cursor
displays a paint bucket and a new region color is created and shown on
the "draw color" button. Clicking the mask image will fill the mask
using the range slider value and the original image pixels at the
point clicked (magic wand function). Holding down the ctrl key while clicking the mask will
select the color at the clickpoint as drawing color. This allows to
create not connected regions sharing the same regional mapping
behaviour. Holding down the shift key will fill the mask directly
without respect to the original pixels - this just changes the color
of the selected region.
Parameters of the mask image are shown on the left of statuspanel:
x, y: the actual mouse position within the image, z: the actual zoom
level , c: the color at the mouse position as hex value.
batch tabsheet
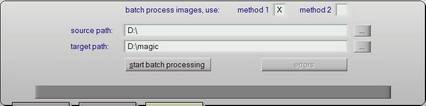
Within the batch sheet, all images of a source directory may be
processed with the values adjusted within the method 1/method 2
tabsheets. The processed images will be saved in the selected target
path having the original image filename extended with characters
specified in the options dialog ("edit/options..."). Batch processing allows
you to see which of your images are particularly suitable for processing
with MagicColors. In demo mode, processed images will only be available as
thumbnails.
Tutorial
Even though MagicColors automatic image processing results in
impressive and award winning images, there will always remain the desire
to edit images by hand. This tutorial guides into using MagicColors
editing functions.
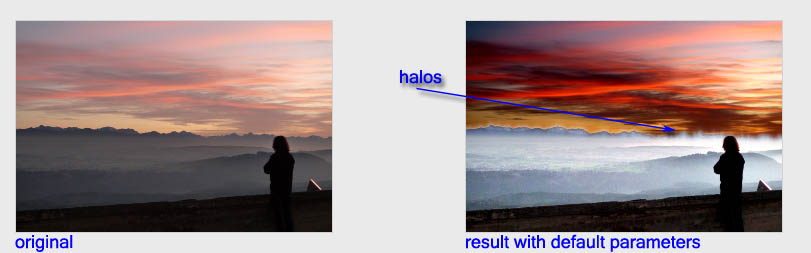
The image above on the left shows an atmospheric sunset with the alps
in the background. MagicColors processing it with the default parameters
produces the result image on the right. The sky becomes very intense,
but the prealps region doesn't really fit, - also there are halos
from some of the alp peaks into the background sky.
Opening the "regions" sheet and setting the "hi shift"/"lo shift"
sliders to the values depicted below for the blue region "0" results
in a more natural looking scene.
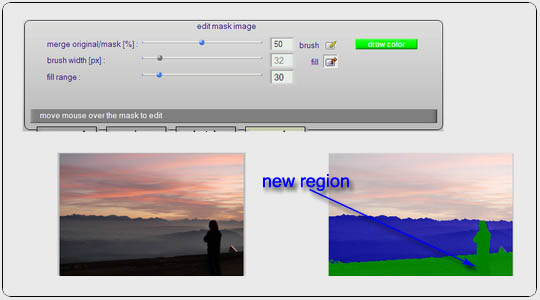
Open the mask sheet, select the fill tool and create a new
region through clicking the arrow point shown below.
Press the "apply mask" button, the program asks to save the edited
mask, press yes. The mask will be applied and the result displays
within the general sheet:
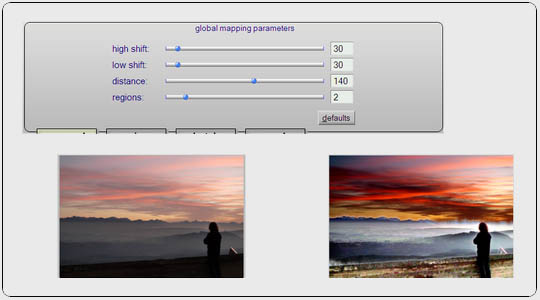
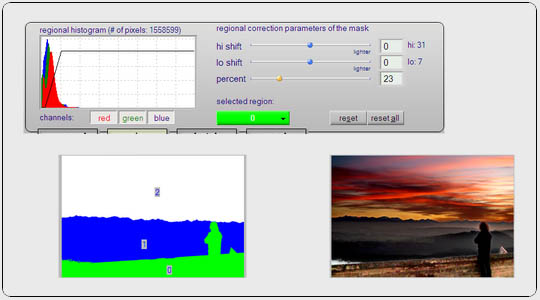
The foreground wall, originally not visible, appears within the
image. The prealp region again is to light, so open the regions sheet
and change the "hi shift"/"lo shift" values for the blue region "1".
To reduce the halo around the guy in the foreground, select the green
region "0" and change the "percent" slider to a low value:
to be continued.
Resources